Are you having trouble keeping your OEC 6800 or 6600 mini C-arm in position? Does the articulating arm gradually sag lower and lower throughout your scans? If so, there's no need to worry. This is actually a very common problem, you'd be far from the first mini C-arm user to ask us about it, and it happens to be a very easy problem to solve as well.
Follow the 5 simple steps in the video below (or scroll to the text version if preferred) to return your OEC mini C-arm to the firm, stable positioning it had when you first acquired it.
How to Fix a Sagging Mini C-Arm
How to Fix a Sagging Mini C-Arm (Text Version)
1. Get a 3/16 Allen wrench and a small flat-head screwdriver.
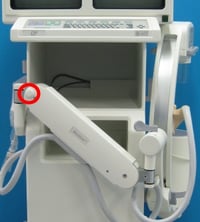
2. Prying gently with the screwdriver, remove the rubber cap (circled in the picture) at the base of arm.
3. Tighten the screw beneath the cap firmly, but not as tight as possible. If you over-tighten the screw, the arm movement will be stiff.
4. Test your arm movement for the desired tension and repeat steps 1-3 as needed.
5. Replace the rubber cap and use your mini C-arm as usual.
In the majority of cases, the steps above are sufficient to return a mini C-arm to firm positioning. If these steps don't work, it may be an indication that you have a deeper issue requiring a replacement part in the arm. If this is the case, our Parts Team is standing by to take your requests and our Service Team is ready to support you with a service call to get the installation done. Contact us for help with this, or any other C-arm problems you might have.